
Sidebar
Index
start:branch_admin:sensors:sensor_setup
Sensor Set Up
In this tutorial I am going to show you how to set up your sensors on your CloudHQ account.
To begin click on the menu button located in the top left hand corner of your screen, followed by branch admin, followed by sensors and then followed by sensors again.
Once on this screen you then need to enter the sensor ID given to you by your supplier. You then need to enter the name and location for your sensor.
THIS INFORMATION MUST BE THE SAME AS THE CONTROLLER
You then need to enter the core information, ensuring the sensor type corresponds to the controller information as well as selecting the corresponding controller name from the drop down box provided.
After you have entered the core information you are also asked to enter the Alive Timeout. This setting allows for there to be communication between the software and the device itself. Setting your Alive timeout to 10 minutes allows for the device to send a signal to the system if there has been no communication during that time. If there is communication during that time frame no alert will be triggered.
You will also be asked to enter the High and Low values. These values act as a visual reference once looking at your data overview screen. Both the high and low values act as a visual boundary for the desired temperature range for your device.
The final piece of information you have to select is whether or not to enable the temperature and/or door sensors. Ticking either of these boxes enables information to come from with selected sensor. Selecting Temperature means that the information from the temperature sensor will communicate with the system and no information will be sent from the door sensor or vice verses.
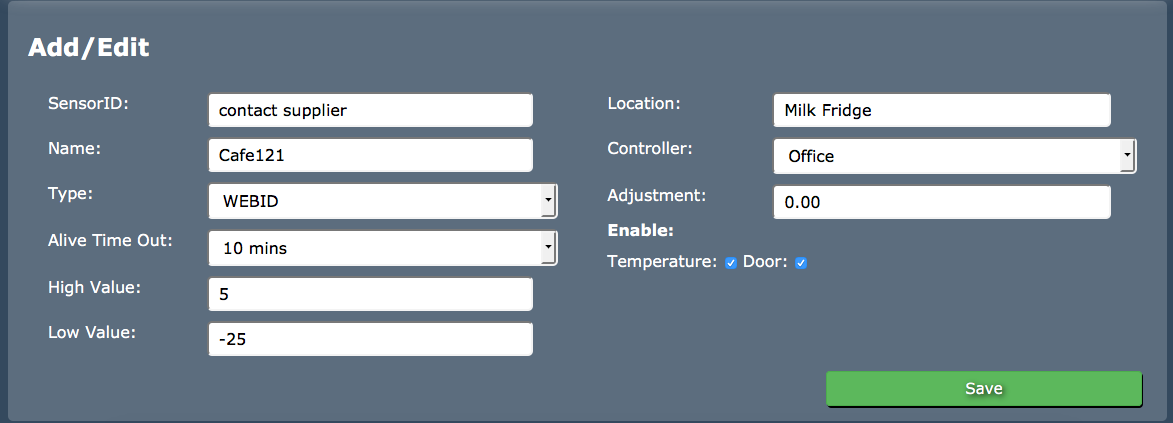
Once you have entered all of this information simply click save. Your sensor and all the corresponding information will then appear at the top of your screen where you also have the option to edit or delete information when required.
 If there comes a time that you are required to adjust the temperature reading on your sensor simply return to this page and enter a positive (+) or negative (-) adjustment in the box next to adjustments.

This numerical value will be recorded as degrees Celsius. Once you have made your changes simply click save. This update will then automatically be sent to your sensor(s) and all records will be updated from the date of the change and the dates moving forward. All previous information will correspond to the previous settings.
start/branch_admin/sensors/sensor_setup.txt · Last modified: 2016/03/11 10:58 by 127.0.0.1